
I built my dream home simulator in my garage using Full Swing KIT Studio. After purchasing our home two years ago, this DIY project caught our attention the moment we saw the 20′ x 20′ detached garage. Now I’m ready to share all the details to help make your dream man cave a reality.
Before I get into it, I want to touch on the good points right away. From now through December 1st, save up to $2,500 on Full Swing KIT Studio. This brings the already amazing price down to a point where you won’t want to miss out on this deal. See below for holiday discount codes. It can be used during the validity period.
1. KIT Studio with PC – $2,500 off with code CYBERPC
2. KIT Studio – Get $1,000 off with code CYBER25
full swing kit studio
Use code “CYBERPC” to save $2,500 on KIT Studio with PC. Save $1,000 on KIT Studio without PC with CYBER25 (valid until December 1st)
Buy now from Full Swing
3. Kit Bundle (Net, Matte, Free Shipping – $900 Value) Code CYBER

Full swing KIT launch monitor
Use code CYBER on KIT Launch Monitor to get free net, mat, and shipping (valid until December 1st)
Buy now from Full Swing
Now, back to building your DIY man cave…
Step 1: Power
When I bought the house, construction was needed everywhere. What was my first choice? Provides electricity to the garage. That way you can see where my priorities were.
My dad and I worked together to dig a trench about 40 feet long and 4 feet deep from the house to the garage to provide power. I bought a PVC Conduit and ran it as straight as possible, making nice 90 degree turns in the middle.
The importance of working with an electrician cannot be overstated. It’s a dangerous game for beginners (like me) to play. Make your own gutters and drains. Leave it to the professionals to install power throughout your space.
Tip: Install power and electrical outlets where you might need them in the future. Spaces are never more accessible than at the beginning of a project. This will save you from having to go back inside the wall later.
Step 2: Choose the right simulator
I had the luxury of working with a full swing simulator team at the American Century Classic Long Drive Competition. I was impressed by the ease of use of the full swing kit.
At last year’s PGA Show in Orlando, we got to see dozens of home simulator setups on display, and we got to test them out. For me, Full Swing KIT Studio stood out. We found Full Swing to be insightful and readily available to answer any questions, tiered pricing to suit your budget, and premium level performance for all optional KIT launch monitors. This total package was hard to come by.
Tip: No matter your budget, you’ll find a launch monitor or simulator package.
Step 3: Full swing support
From the moment I started communicating with the Full Swing team, I knew I had made the right choice. Together we discussed how to make the most of my space using the full swing kit studio options that best suited my space. They’ve seen it all and done it all, so it was reassuring to have their support and reassurance in the decisions I made.
Tip: My design process started with a simulator, and everything else revolved around it.
Step 4: Update the exterior
Before we could get to the fun stuff inside, we needed to do some exterior work on the garage. The original wood siding was badly damaged and the traditional garage door had been slammed down.
I was able to find something that matched the vinyl siding in my house to create a cohesive look. The garage door needed to be replaced before it went up. Since there is a simulator installed, we had to be careful about the windows. There was only one place where the windows worked to avoid the danger zone. So, I decided to install two French doors as an entrance to the main garage to let in more natural light and create the aesthetic I wanted.
Tip: It may feel weird at first, but make sure you have a door that opens outward. If you’re short on space like me, make sure you have every inch of space inside the simulator room so it doesn’t get in the way of your swing.

Author’s garage in demo stage. tim riley

Tim Riley’s completed garage. tim riley
Step 5: Ceiling height and overhead storage
The garage originally had 7.5-foot ceilings and storage space above the entire 20 feet. That wasn’t enough to make a full golf swing. I decided to cut out 12 feet of storage space above and leave the space completely open with nothing on top so I could swing without fear. I didn’t want to lose all of my valuable storage space, so I kept it at 8 feet.
We did away with the old staircase and installed a pull-down model to create more space for daily use below. This is something I highly recommend. Because how often do you go to the extra garage storage space upstairs?
If in doubt, ask your tallest golf buddy to swing the driver to make sure there’s enough headspace in the simulator.
Tip: Work with your contractor before performing work on a load-bearing item, or ask your contractor if it is a load-bearing item. This is something you need to seek advice and cooperation from experts.
Step 6: Paneling the walls and ceiling
My first dream was to have a barn garage. That dream was quickly dashed when he heard Barnwood’s quote. After all, we’re working on a budget here.
As new homeowners often do, I was walking around Lowe’s and found a T1-11 panel. Exactly what I was looking for at a fraction of the cost. My first fear about the simulator setup was that it would have walls that could be easily damaged. Sheetrock is a snap and most wall panels are pretty flimsy. Not T1-11. The siding was perfect and cost just over $1 per square foot. end!
On the same walk, I noticed a spray painted sign advertising a sale. But it wasn’t the sale that caught my eye. It was spray painted particle board. This is one of those woods you walk right past without ever considering using it on the front of your home. But after a few coats of paint, the texture and design of the particleboard really started to shine. It complements my T1-11 wall panels and provides a contrasting look to the ceiling and overhead storage.
Tip: Use extra pieces of wood as samples for staining and painting.

Interior of the author’s garage under construction. tim riley

The interior of the garage is under construction. tim riley
Step 7: Heating/Cooling
I live in the Tohoku region, and the winters are very cold. To keep myself and the Full Swing Simulator equipment warm, I need a heat source. MrCool is perfect for DIY projects. This mini split costs significantly less than the popular brands while offering comparable performance. Even if you don’t feel like installing it yourself, hiring a handyman can save you a lot of money.
Tip: Get a unit with slightly more BTUs than you need to avoid overexerting your machine. It works best and is energy efficient when it can easily handle the square footage.
Step 8: Flooring
Luckily I started with a clean, dry cement slab as a base. There were a few cracks that needed to be filled with cement repair tube, but other than that I had a great starting point.
We put a moisture barrier layer on top of the cement so we don’t run into moisture or mold problems. It’s as simple as rolling it up, cutting the ends, and taping the seams. If you wish, you can also lay down whatever you like as flooring on top of it. I decided to put down a rubber gym/playroom mat to insulate the floor and provide another barrier between the floor and the cement slab.
I went back and forth for a while over the flooring I wanted to use. One cohesive grass bed, rather than just a lawn where the simulator is – and I’m very happy to be able to do that.
The Full Swing team was once again a great help throughout this process and recommended a company called GrassTex. After consultation, they recommended the “MoneyPutt” model. I chose it to offer a beautiful grass floor that could also be used as a large putting green.
Tip: If you’re on a budget, this is definitely something you should do yourself. Laying flooring is very easy.
Step 9: Reuse
Not everything needs to be new. It’s not far off! I felt intense guilt about some of the items I threw away during the home renovation process. Then the light bulb went off. Some of this can be reused!
The kitchen was scheduled for an upgrade, but the cabinets were still in good condition. I set the upper and lower cabinets aside for garage storage. So was the refrigerator found in the basement, which needed a good cleaning. If I bought these items new, they would have cost well over $1,000.
Tip: Facebook Marketplace is your friend. You may be surprised to see the price of a “like new” item that you were considering purchasing new. I listed a new Pottery Barn leather sofa for $2,500 and bought it for $100 with no scratches. I raised my hand and bought one for my basement. I didn’t measure it, so it didn’t fit in the door frame.
Plan B? I now have a great garage sofa.
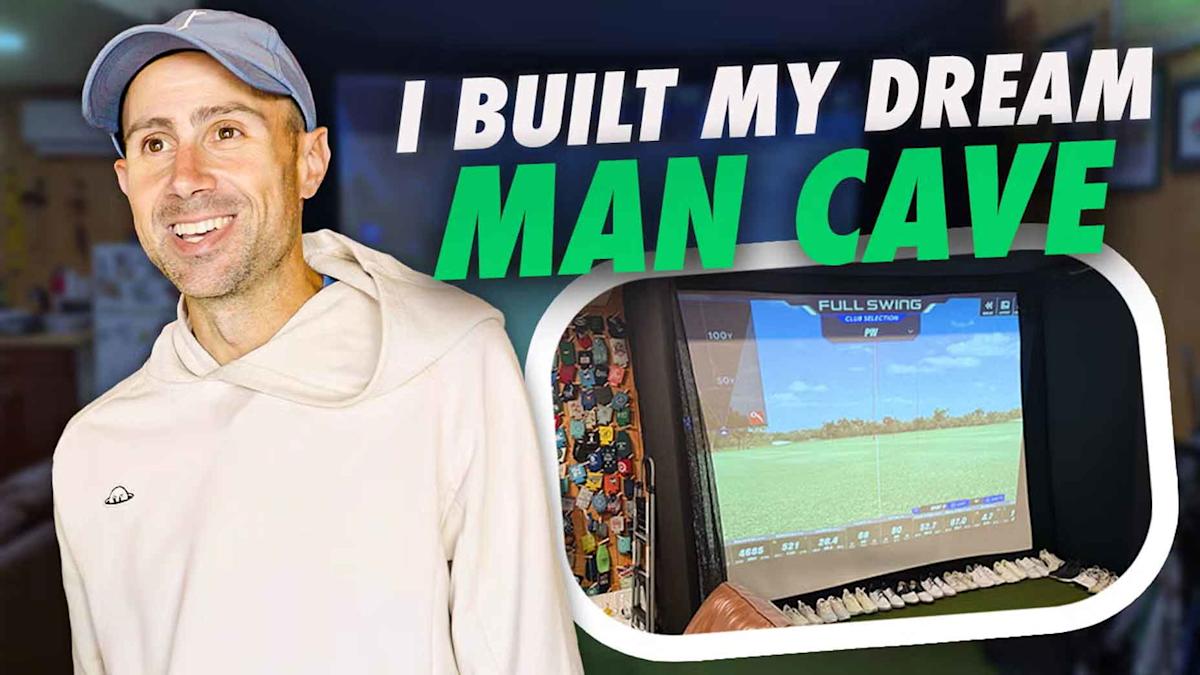
Step 10: Build the simulator
I was a little worried about how the Full Swing KIT Studio would be shipped. It arrived on a well-packed pallet and the delivery service drove it to my garage. There was no point in worrying like that…
Full Swing provides detailed step-by-step instructions for installing the simulator. One or two sets of caregivers and a step stool/ladder are required. It took my dad, my neighbor, and I about 90 minutes to finish putting everything together. The process is like installing a Lego set, but with a more rewarding ending.
Although the packaging and accessories look complicated at first glance, it is very easy to assemble and is much stronger than I expected.
Tip: Stock your garage refrigerator with adult beverages for your helpers.
Step 11: Decoration advice
Where Dive Bar Meets The Bridge: That’s what crossed my mind when I started decorating my man cave.
I wanted the comfort of stepping into a dive bar and the décor of The Bridge, a private club on the eastern end of Long Island. One of the most unique clubhouses and facilities I’ve ever been to. Think of this as the coolest art gallery you’ve ever visited, with a beautiful golf course right outside your door.
As I look around this space today, I think I accomplished what I set out to do.
Tip: Be true to yourself. Find something that makes you happy and put it on your wall.

A view of the author’s garage simulator. tim riley

A view of the author’s DIY golf bag rack, repurposed cabinetry, and artwork. tim riley
Step 12: DIY fun
There’s a Facebook group I’m a part of called “DIY Man caves” that was a huge inspiration to me before and throughout the process. I joined this group years ago as a hobby, and found myself bookmarking and referencing posts, threads, and comments for years. I’m not a very handy person, and it turns out that most of the people in my group aren’t either. They learned through trial and error, YouTube, and the advice of wise people in their group.
Ideas like hanging old scorecards from the ceiling and using eye hooks, string, and hanger clips to create a fun accent wall for koozies helped solve the golf bag problem. Day after day, I would go to the garage and watch my bags fall like dominoes. I really didn’t want to buy that cheap bag rack. Members recommended using sturdy eye hooks on the wall and bungee cords around each bag. Now I can safely line up my bags without moving an inch and easily taking them out and putting them back at any time.
Tip: Join our Facebook group “DIY Man Caves”
Step 13: Full swing benefits
There are 16 data points available through Full Swing’s KIT launch monitor. I’m not a data geek. Having a bunch of numbers running through my head before a shot doesn’t help me. However, there are some data points that can be very helpful when using the driving range feature. All this data is stored on your phone and helps you practice with purpose.
As a PGA Tour Partner, you can’t beat the selection of courses you can play using Full Swing software. The selection is top-notch, including Pebble Beach, the Old Course, and TPC Sawgrass. The graphics are also great.
If you want to hit the ball away from the simulator, you can carry a full swing kit with you. Compact and lightweight, it is easy to carry. You can pack it for a trip, to the driving range, or to attend a casual practice round. In the meantime, I will continue to collect useful data with the Full Swing app.
Tip: Use Full Swing data in the way that is most useful to you.
14: Do your research
Whether you’re finding the right simulator for you or powering an entire space, take the time to talk to experts and people who have gone through similar processes. You’ll be surprised how much you can learn from every conversation. Don’t just take someone’s word for it and buy the first thing you see at the hardware store.
You don’t want to discard a new project after finishing it.
Tip: Never regret if it takes you a little longer to buy something because you wanted to understand yourself better first.
15: Never grow up
Clint Eastwood once told Toby Keith, “Don’t let the old man in,” a mindset he used to stay young at heart and one that inspired Keith’s songs. The same words apply when building your dream man cave or simulator room. These projects are meant to be fun and keep us feeling young.
Never forget that.
Tip: Whatever your dream “Neverland” man cave is, go for it.
Questions? The author welcomes your comments and questions at Tim.Reilly@golf.com..
The post I built my dream home golf simulator in my garage. Here’s how it first appeared in golf.